If you want to start your expense tracking from today, you’ve landed on the right page.
Here not only you will learn about expense tracking, but you can also download a tool to start doing it today.
What is this tool? This is my budgeting and expense tracking Excel-based worksheet.
It is a unique tool that has helped me to manage my expenses (both cash and credit card) for the last 10+ years.
Why do I say it is unique?
Because it works on a concept of expense tracking which you will not get elsewhere on the internet.
- 1. Benefits of Expense Tracking.
- 2. My Tool: Expense Tracking in Excel.
- 3. The Concept: How Expense Tracking Works.
- 4. How to Use The Worksheet?
1. Benefits of Expense Tracking
I’ve written a separate blog post about the benefits of expense tracking. I strongly recommend you to read it (first).
It’ll give you a clear idea of why to budget and track expenses in the first place.
To just summarise the advantages that come with expense tracking, this is what I think about it:
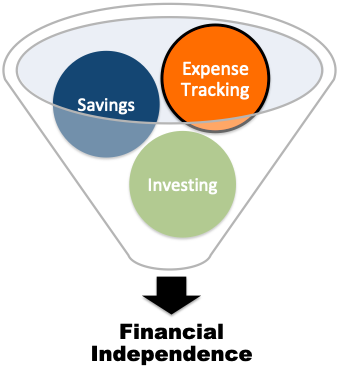
To attain the ultimate goal of financial independence, a combination of “expense tracking”, “saving” and “investing” is necessary.
In isolation, neither of the above three will work.
Expense tracking alone is meaningless unless it results in more savings.
Similarly, savings alone is not even half effective till it is invested.
2. My Tool: Expense Tracking in Excel
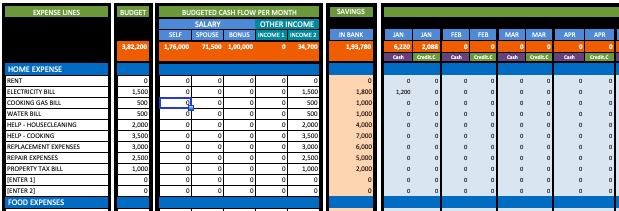
My expense tracker worksheet helps me to track my spendings and also helps me to prevent overspending (resulting in more savings). How?
- First, it helps me to budget my expenses.
- I can use it to track expenses.
- I also use it to “visualise” my savings break-up (I rarely check bank account balance).
I first started using excel sheet to track my expenses way back in year 2009.
Since then, there has been several updates of this worksheet.
Today, it has evolved into a saleable product (though a very humble one).
Since last few years, I started getting queries from readers about how “I” personally do my expense tracking?
I felt that making my tool available for my readers will be a good idea.
Like I’ve shared my stock analysis worksheet with my readers, I’ve decided to do the same for my expense tracker.
But as it is a unique tool, it is essential for me to explain its usage.
So, lets start with the concept on which my expense tracker works…
3. The Concept: On Which My Expense Tracker Works
The thing that makes my expense tracker unique is its concept.
It has a simple concept:
All expenses must be financed from savings. First build savings, and then spend it wisely
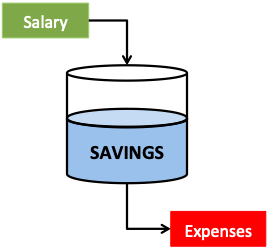
What does it mean?
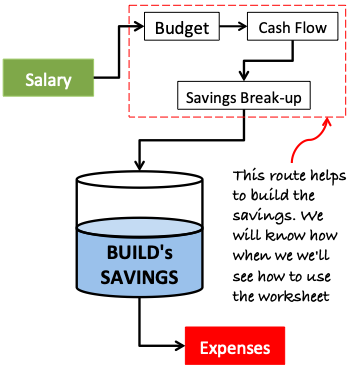
- Building Savings: My expense tracker has its focus on savings. It keeps the users attention on how to build the savings. It also highlights the quantum of savings available (for each task). This also prevents overspending. We will know more about it here. Symbolic representation of how my worksheet triggers savings habit is shown below:
- Spending Wisely: What can be called as wise spending? When cost of every purchase is lower than the available savings (not budget), it becomes a wise spending. Showing the self-control of not-spending, till enough saving is built, is the key. This worksheet can trigger such a control. We will know more about it here. Symbolic representation of how my worksheet ensures careful expending is shown below:

Let’s start to know more about the worksheet – “how it can help to build savings…“
A. Building Savings
Before one can actually start the process of expense tracking, it is necessary to first ensure that the exercise is effective.
How to make it effective? By starting from the very basics of cost management:
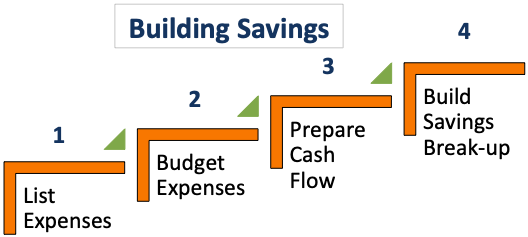
- #A.1. Expense Listing – List down all expenses.
- #A.2. Budget Expenses – It quantify’s expense line items.
But my expense tracker sheet takes two extra steps:
- #A.3. Prepares Cash Flow – It creates a balance between income and expense budget.
- #A.4. Creating Savings Break-up – It breaks down lump-sum amounts parked in bank account (savings) into more realistic and usable numbers.
These four (4) steps together builds the savings. We will see how in next section.
Once the savings is built, the process of expense tracking can start.
#A.1 Expense Listing
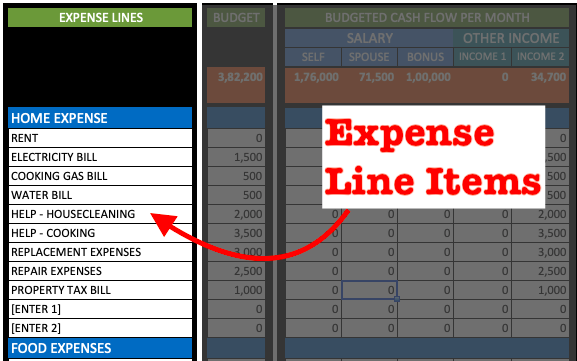
The first step of building an expense tracker is listing down of all expenses. The user must do this manually. The best way to do it is by recalling all past expenses in last few months. I did it also by recording all expenses as it happened. In my expense tracker, the list of expenses looks like this:
#A.2 Budgeting Expenses
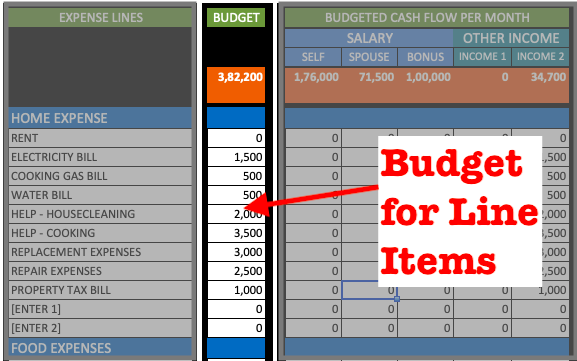
Once all expense line items are listed, the next step is their quantification. This is called budgeting. The user must do this manually. Budgeting means finalising the maximum allowable expense. It is a critical step of expense tracking. Fix these values with extra care. In my expense tracker, the budgeted values for each items looks like this:
#A.3 Preparing Cash Flow
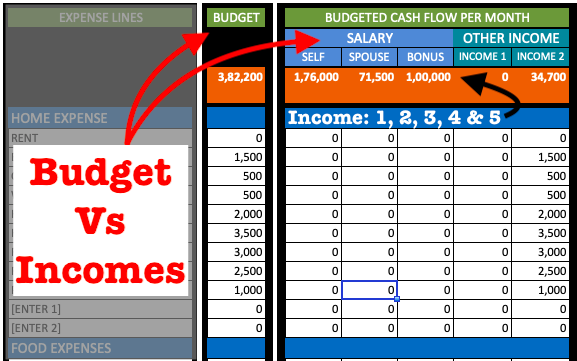
Fixing a budget is good thing. But it is also essential to balance the budgeted expenses with income. Why? This is done to ensure that total of all budgeted expenses equals the total income. Moreover it will also establish which income source is feeding which expense line items.
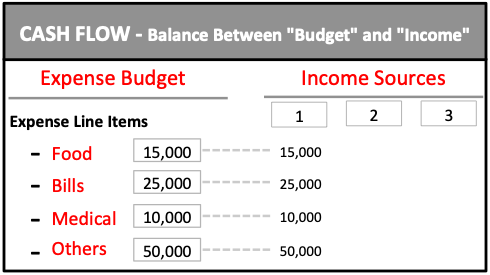
A symbolic representation of a balanced “budgeted expenses” and “income sources” is shown below:
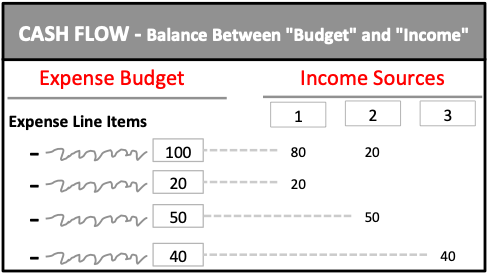
In my expense tracker, the cash flow balance looks like this:
#A.4 Creating Savings “Break-up”
This is a key feature of my expense tracker. To make it more understandable, I’ll use an example. Suppose your salary income is Rs.100,000 and you have budgeted your expenses as shown below (cash flow report):
What is the next step? The next step is transferring Rs.100,000 from your salary account to a separate savings account.
The money in savings account will look like this:
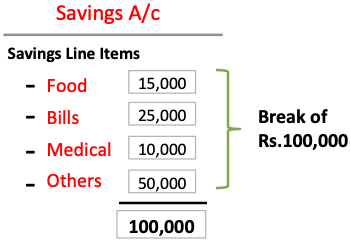
There is a way to read the above saving line items. How to do it?
Having Rs.100,000 in savings account may look tempting, but seeing it in break-up makes it more real. How?
Though you’ve Rs.100,000 in savings a/c, but on the account of “Other” expenses, the money available is only Rs.50,000.
So, even if you want to buy a Rs.85,000 price smart phone, you cannot do it. Why? Because there are no funds for it.
In my expense tracker, the savings break-up looks like this:
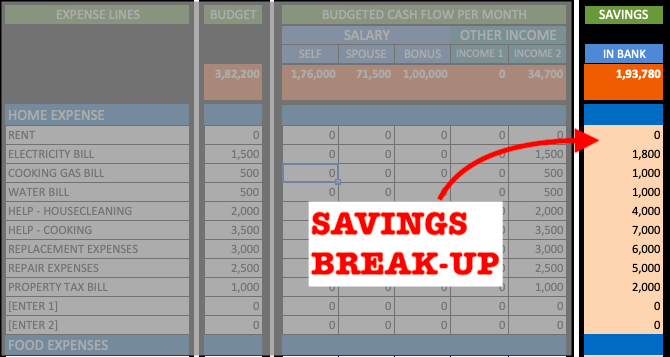
NOT visualising your savings as a lump-sum amount parked in savings account is a key in developing wise spending habits.
But there is more that needs to be done to keep spendings in check. What?
Recording of all expenses. Lets see how…
#B. Spending Wisely
The trick to spend wisely is to always be aware of your item wise affordability.
Let me explain it with an example:
Suppose you are a “wise spending” millionaire. The money parked in your savings account is say $5 million.
As you are a wise spender, you have built-up your own savings break-up. It looks like this:
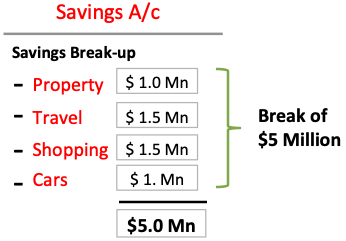
Recently you’ve heard that a Villa in Palm Island, Dubai will be a good holiday home.
So you enquired about its pricing. It came out that a 10,000 SQFT villa in Palm Island will cost $1.5 Mn.
But as your savings break-up (“Property”) showed that your affordability is only $1.0 Mn – you decided to go for a smaller house.
What is the learning from this story? Awareness of affordability is a key when it comes to wise spending habits.
My expense tracking worksheet helps its users to create just that.
This sheet not only assists in creating a budget, but it transforms the budget into a more effective metric called SAVINGS BREAK-UP.
#B.1 Tracking Spendings
How to track spendings? By recording (keeping a note) all spendings done each day (every day).
Why tracking is useful?
Let’s take our millionaire example to justify the usefulness of expense tracking.
Your savings break-up looks like this:

Suppose, instead of buying one villa, you want to buy five (5) smaller villas.
Your enquiry confirmed that 3,500 SQFT villas will cost you $0.2 Million on average.
Hence you decided to start the purchase. But you also made sure that you are recording all transactions.
The records of transactions looks like this:
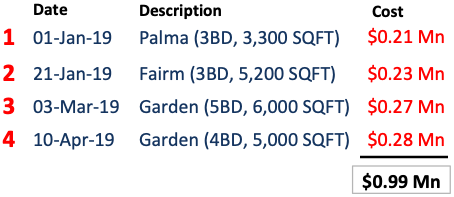
Your plan was to buy 5 homes. But you have exhausted your budget of $1.0 Million in 4 homes itself.
Had you not been recording your transactions, you would not have realised that you cannot afford a fifth home.
What is the learning?
No matter how high or low are ones savings, sticking to ones “savings break-up” will ensure wise spending habits. How to stick to this rule? By recording all expenses, and tracking balance of savings break-up.
4. How To Use The Expense Tracker Worksheet?
There are four sheets in the expense tracker worksheet:
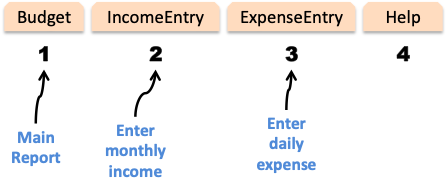
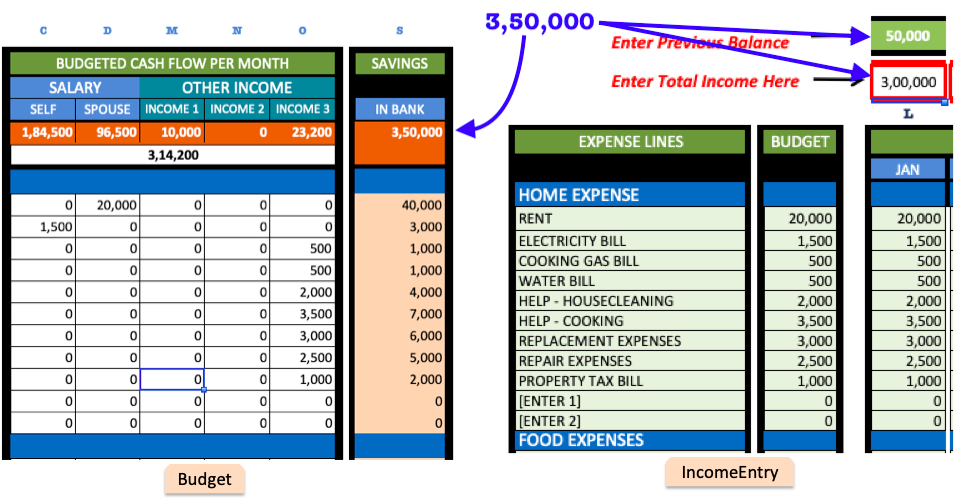
- 4.1 BUDGET: This sheet is used to finalise the “expense line items”, “expense budget”, and “cash flow”. This sheet is also used as a FINAL REPORT sheet. If you want to see a summary of how much was spent in a month, it is done here. This sheet gets updated from data entry done in “Income” and “Expense” sheets. A user must START from this sheet. Check the above video guide for better understanding.
- 4.2 INCOME ENTRY: After the work on “Budget” sheet is done, the next sheet is “income entry” sheet. Here the exercise is minimum. Just add a lump-sum value of your total income. Suppose in the month of Jan’19 your income was Rs.100 and your spouses income was Rs.110. In this case the value to be entered will be Rs.210 (100+110). Check the above video guide for better understanding.
- 4.3 EXPENSE ENTRY: Your daily expense transactions needs to filled in this sheet. The data entered here will automatically updates values in BUDGET sheet. To better understand the rules of data entry in Expense Entry sheet, please see the above video guide.
- 4.4 HELP: This sheet explains how to use the expense tracker worksheet to its user. There is not data entry required here. But I’ll recommend you to follow the above video guide for quick understanding.
Let me tell you more about the above sheets:
4.1. Budget Sheet
There are three parts on which a user can work in the budget sheet:
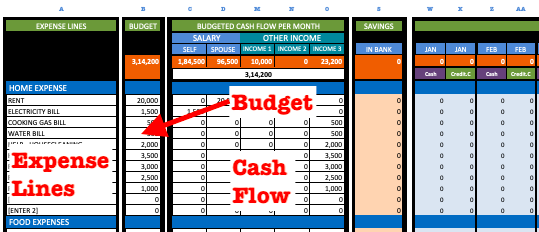
- Expense Line: In the budget sheet, first list down all the expense line items. I’ve already listed few typical expenses valid for an Indian consumers. You can also edit the predefined items or also add new expense line items (Please check the video).
- Budget: Against each expense line items, put a budget. The budgeted values will tell you how much expense is allowed each month on a particular line item.
- Cash Flow: How to do it? Against each budgeted line item, try to answer which income source will fund it. Suppose there are two working members in your family (yourself and spouse). Then distribute all the budgeted expenses in such a way that “total expense” equals “total family income” (self+spouse).
Once these three activities are done, the user is ready to go to the next sheet (IncomeEntry sheet).
4.2. Income Entry Sheet
As the name suggests, the user must enter the income data in this sheet.
There two types of data that can be entered in the income sheet:
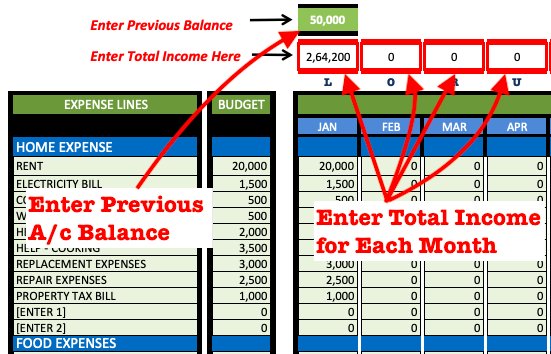
- Total Income: Suppose in the month of Jan, ones total income credited in the bank account was Rs.2,64,200. So, as displayed in the screenshot, the values must be entered in the fields shown above.
- Previous Balance: Suppose the savings accounts which you are using to park your “savings break-up fund” already has some money (say Rs.50,000). In this case, indicate this value in the green cell shown in screenshot above.
Just enter these two values. Once the value is entered, the worksheet will create the savings break-up automatically.
The total income plus previous balance entered in the income sheet will also appear in the Budget Sheet.
4.3. Expense Entry Sheet
This is the sheet where the daily data entry work is done.
This is the most used sheet of the expense tracker worksheet.
Though the data entry process is simple, but there are few rules to be followed by the user.
Let’s first familiarise ourself with the data entry points:
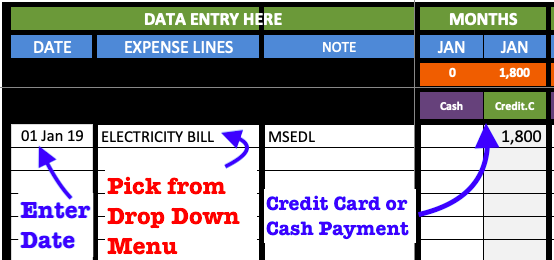
Suppose you’ve paid your electricity bill of Rs.1800 on 01st Jan’19 using your credit card. How to enter this data?
- Date: In the date column, the data to be entered in 01-Jan-2019.
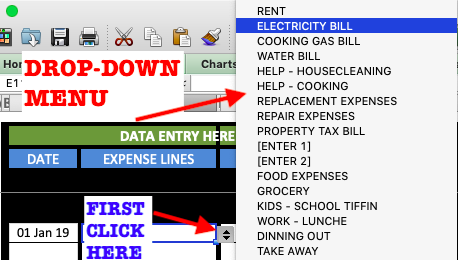
- Expense Description: The description should not be type written. It must be picked from the drop-down menu as shown below:
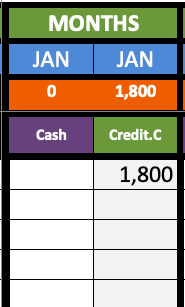
- Value Spent: In our example the value spent was Rs.1,800 using credit card. This data will look like shown below. Please note the value of Rs.1,800 is shown under Credit-card column and not under “Cash” column. What is cash? Any expense form other than credit card transaction (like ATM withdrawal, online banking payment. debit card swap etc).
4.3.1 How to Enter Data for Credit Card Bill Payment?
This data entry is different from other expense entries.
Suppose your credit card bill for Jan’19 was of Rs.12,600.
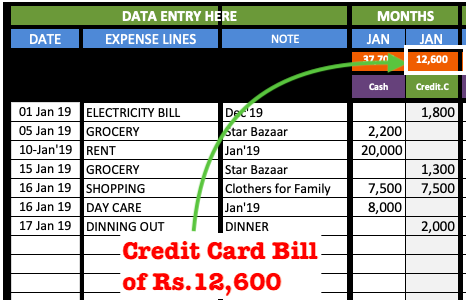
The query is, once this amount is paid (Rs.12,600) – how to enter this data into the Expense Entry sheet?
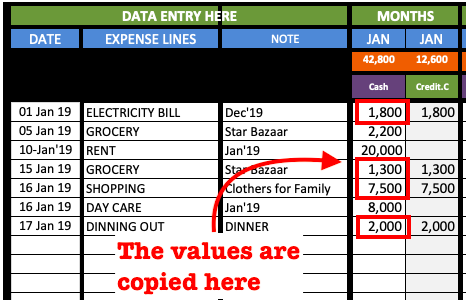
Just copy the values from column named “Credit.C” to column named “Cash”. Like this:
Final Words
There are hundreds of mobile available which can facilitate expense tracking.
But the benefits of doing it in an excel sheet has its own benefits. The most visible one is “the depth of reporting”.
Moreover, one can also customise the excel sheet as per ones requirement.
I’ve done just that. My expense tracking worksheet is a result of such an exercise.
Another benefit of tracking expense in my worksheet is it “unique” way to tracking expenses vs available savings in ones bank account.
This is a very effective way of preventing oneself from overspending.

Excellent. You have worked it out pretty nice and simple. The download link for the worksheet is not working. Kindly provide a link.
Hi,
Good to see you have explained it step by step. It will be helpful if you can share the excel sheet. Thanks
Hi,
Nice explainer but I am unable to download the sheet…it says page not exists.
Budgeting and Expense tracker Excel sheet is not able to download please look into it & kindly share me on email